The Outline: Not One, but Many
Just because it looks like a pyramid doesn't mean it's a pyramid scheme.
This post is part of the Outline With Me series. For more like this, check out the outlining your novel page.
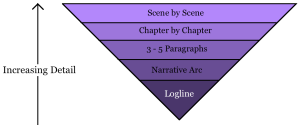
After completing the first five steps in the Outline With Me series, a writer should now be in a decent position to really get cracking on the first draft of an actual manuscript. The final thing I like to do before filling a page with the words of a first draft is to create a series of outlines in an upside-down pyramid sort of way (also known as the reverse funnel system).

Before you navigate away from this page to avoid being brainwashed on Invigaron, let me assure you that the reverse funnel has less to do with multi-level marketing and more to do with the ballooning level of detail that comes with every subsequent outline.
The logline itself is a sort of outline, as is the narrative arc we established shortly after creating the logline. From here, what I like to do is create a 3-5 paragraph summary of the plot as a whole, which helps fill in some of the gaps between the events detailed in the narrative arc. This will help generate ideas for how this outline can be broken down into chapters, and from there, individual scenes.
When working on the 3-5 paragraph outline, remember that you're not writing your novel yet. If it feels like your outline is running long, it may be because you're including too much detail for a broad brushstrokes guide, so to speak. Save the minutiae for subsequent outlines.
Once I have a few paragraphs in hand, I then move into a chapter-by-chapter outline. It will end up looking something like the below.
Chapter One: Character does a thing in their "ordinary world." The inciting incident occurs.
Chapter Two: Character reacts to inciting incident.
The above are extreme generalizations, but this is normally how I would arrange the content. I give the character's name, the actions they are taking as the novel begins, and then describe the inciting incident as it will occur on the page. For the second chapter, I pick right up where the first left off, providing a more fleshed out reaction from the protagonist to the events of the first chapter. I also make it a goal to limit the outline for each chapter to five sentences or less.
I go on in this manner, working my way through the seven elements of the narrative arc while using the logline and paragraph-based outline to structure the story as a whole. While doing so, I keep in mind the scene-goal-conflict-resolution-cliffhanger structure I've described in previous posts.
Once I've made it through the story's resolution in the chapter-outline format, I then take the chapter outline and translate it into the aforementioned structure to create a scene by scene outline. It will ultimately look something like the below.
SCENE: A horse walks into a bar.
GOAL: Horse wants to get a drink.
CONFLICT: Bartender asks horse, "why the long face?"
RESOLUTION: Horse jacks bartender in the chin.
CLIFFHANGER: Horse is arrested for assault.
Granted, in the past I've mentioned that outlines are not contracts, but with a good feel for the detail of our world, characters, and our story already established via the steps described in the previous posts in this series, one should be able to move through the outline process with enough confidence to know the final scene-based outline will be enough to get through a first draft. Remember, no one has to (should?) see your first draft. Just trust yourself to get the words down, and once the entire draft is complete, let it sit for a while before you go back, read it, and find what needs tweaking.
And there you have it! By following these steps, you'll have created a series of outlines with increasingly greater detail to help guide you through the writing of your novel, scene by scene.


